I’ve been thinking about airbrushes a lot lately and there’s been increasing discussion on some of the various hobby groups and boards I participate with or lurk on. The discussion usually starts with someone asking what specifically they should buy or do when they’re starting out with airbrushing. This is a pretty interesting subject and I’ve got a fair amount of experience with it so I thought I’d share a bit of what I know with you all. After I started writing about airbrushes I realized that there is so much to talk about that it would probably be better if I broke this up into a series of articles rather than one ginormous TLDR post. What I’ve decided to do is to turn this into at least a three part series where I’ll cover airbrush basics and my recommendations on specific airbrushes based on my experiences in part one. Part two will cover compressors, hoses and other related hardware and finally, part three will cover necessary and optional accessories – things that I find handy to have around when airbrushing.
Before we really get rolling here I want to mention a couple of important things. First, through this entire discussion I’m going to talking about airbrushes and painting using Acrylic water based hobby paints. These are the same type of paints you’ll typically use for brush painting miniatures and hobby models, brands like Vallejo, Reaper, Games Workshop, etc. I don’t use enamels or lacquers at all so the information presented here may not be suitable for people using those types of paints. Second, if you’re thinking that getting an airbrush will magically make you a master painter as soon as you hook everything up and start spraying paint, well, stop thinking that. Airbrushing will allow you to do a lot of neat stuff and get really nice finishes but it comes with its own set of problems and learning curve. Like any other skill, you’ll need to put the time and effort in to master your craft and fully take advantage of what an airbrush can offer you. Lastly, all airbrush paints are different and most will need to be appropriately thinned in order to spray them with an airbrush. Even the ones that are pre-thinned or labeled “air” paints will sometimes need extra thinning or benefit from some tinkering. I’ll cover this at a later date in a separate article.
The Basics – Airbrush Feed Types
There are three types of feeds for airbrushes. The feed type describes how your airbrush moves paint from the reservoir through the brush body and out the nozzle as you paint. These types of airbrush feeds are Siphon Feed, Side Feed, and Gravity Feed.
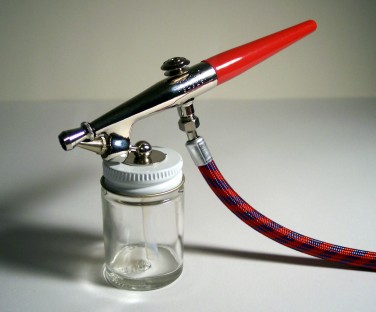
Siphon feed means that the reservoir is connected to the airbrush via a spigot under the body. The reservoir is typically a jar with a screw on lid that has an integral hose/pickup tube that sucks paint up into the airbrush when you press the trigger. This style of airbrush is good for moving large volumes of paint which makes it good for terrain or base coating larger models but will generally not be precise enough for detailed work. To be honest this isn’t much better than using a rattle can so I don’t really recommend this style of airbrush for miniatures. (Rattle can = commercially available aerosol spray paint cans with a ball agitator inside that rattles around when you shake it up)
Side feed airbrushes have the spigot or attachment point for the reservoir straight off the side of the airbrush body so that the paint reservoir sits parallel to the body. These typically have a paint cup and some can be attached to either side of the airbrush which is helpful for left/right hand users. This airbrush style is used a lot by illustrators but in my experience isn’t that great for people doing models or miniatures as the cup seems to always make using this style of airbrush awkward because of the widely varying surfaces and angles you encounter when painting small models.
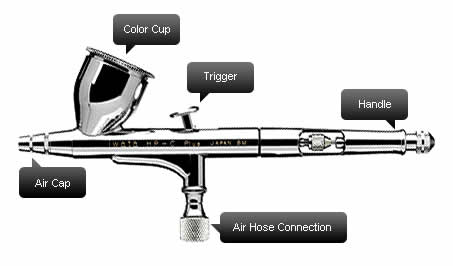
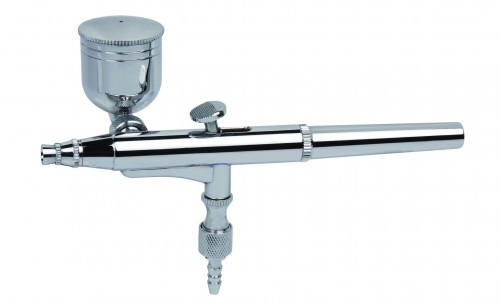
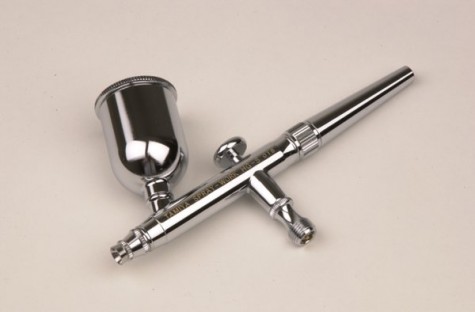
Gravity feed airbrushes have the paint reservoir attached to the top of the airbrush right on the barrel. Paint goes in the cup and when you press the airbrush trigger paint flows into the air stream and out the nozzle. Gravity feed airbrushes, in my opinion, are the best choice for painting models and miniatures because they require lower air pressure to operate and allow you more control over the amount of paint coming out of the nozzle. (You can really thin down paints or use inks and dial down the air pressure to get very fine lines when using this type of airbrush).
Gravity feed airbrushes will sometimes be manufactured and sold with different cup sizes or interchangeable cups so make sure you know what you’re getting before you purchase. I tend to favor the medium size cups although a large cup is handy if you’re base coating something large or assembly- lining a bunch of miniatures.
Airbrush Action Types
Airbrush action refers to what happens when you press the trigger on the airbrush. There are two kinds of airbrush action, single action and double action. Single action airbrushes are the spray guns of the airbrush world. This means that when you press the trigger it operates the same way a rattle can works – paint and air flow out of the nozzle all together. You don’t get to decide how much paint comes out when you press the trigger, it’s all or nothing. For this reason you should avoid a single action airbrush.
A double action airbrush has a two stage trigger system. The trigger moves up and down as well as traveling front to back. This means when you depress the trigger you get airflow without paint and as you slide the trigger back towards you, the paint starts to mix with the air and flow through the nozzle. The further back you slide the trigger, the more paint flows through the nozzle. This allows you a great deal of control over the paint and air mixture enabling you to go from a large flow of paint for broad coverage to fine lines when you need to hit some small details. This does take some getting used to and you’ll need to practice controlling your paint this way but eventually it becomes fairly intuitive. I absolutely recommend you get a double action airbrush.
Airbrush Needle and Nozzle Sizes
Airbrushes come in a variety of needle sizes and you usually find that they have a matching nozzle that either comes packaged together with the needle or will need to be purchased along with it. Needle sizes are usually defined in millimeters, like .21mm, .35mm, .5mm etc. The larger the number, the larger the coverage with that needle and nozzle set.
The largest needles that you’ll be interested in are the ones around 5mm but you really only want to consider this for areas where you need to put down a lot of paint as you won’t be able to do fine detail work with this size range of needle.
Going down a bit from the largest are the .3mm – .35mm “mid range” size of airbrush needles. These are pretty good all around sizes and will allow you to base coat and do some detail work, stripes, checks, camo patterns, etc.
Lastly for our purposes is the range of needles that fall around .20mm to .25mm. This size range is going to give you some really fine lines and allow you to do some nice freehand work. You can also do some base coating with this size but you’ll need to have everything cranked up so you can get the coverage you want. This size range is what I typically recommend because while it may feel a bit overwhelming when you first start out, if you do even a moderate amount of airbrushing you’re going to grow into this fairly quickly. You’ll be able to take advantage of the fine control you already have rather than buying a less capable “starter” airbrush and then needing to replace it a few weeks or months later.
So What Kind of Airbrush Should I Buy?
To sum up you’re going to be looking for an airbrush that is Gravity Feed, Double Action, and .20mm to .30mm needle and nozzle size. Next we’ll take a look at some different airbrushes and I’ll share my thoughts with you based on my experiences with some that I own or have used.
Airbrush Reviews and Recommendations
I’ve been using airbrushes for close to 30 years but not continuously during that time so it’s been sort of a weird learning curve. I started like a lot of people probably did all that time ago – with a cheap plastic hobby shop single action siphon feed brush that was basically akin to a rattle can that you could change colors with. This came with a thin plastic hose and an adapter that allowed you to attach it to a canned air source. This is probably the worst way you can start and I bet that a fair number of hobbyists never get any farther than this because it’s a big dumb ungainly set that doesn’t give you any of the control or benefits of a quality airbrush set up. I’m pretty sure you can still find these Testors brand airbrush kits at places like Michael’s or other craft and hobby stores. Avoid these, you’re going to waste a lot of time fiddling with this and no matter what, you’ll never get fine detail work out of one. On top of that, canned air is ridiculously expensive and wasteful. At $12 to $14 per can of air, it’s likely that by the time you learn to get any decent results with this setup you will have spent enough money on canned air to have purchased an actual airbrush compressor.
Having owned and/or used several different airbrushes I feel very comfortable recommending the following three. These are quality products backed by reputable companies. The airbrushes, accessories and parts are all readily available at good hobby shops and online. Here are my top three recommendations:
Iwata HP C Plus Airbrush Mini Review
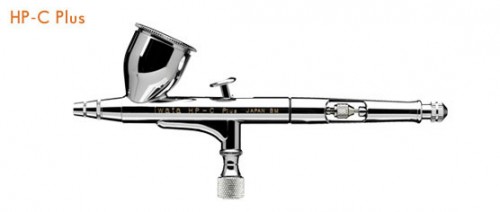
The Iwata HP-C Plus Airbrush is a solid, high quality dependable workhorse that will take you a long way
When I finally decided to get serious about airbrushing – about 10 years ago – I made the jump from a Badger series 150 to the Iwata HP-C Plus airbrush. It was a huge step up in quality and control. This airbrush is a high performance, high precision workhorse and has served me well. It is dual action, gravity feed and has a nice 1/3 ounce color cup. These can be purchased with either a .3mm or .2mm needle and nozzle and you can swap them out if you decide to start with the larger size and work your way down as you become more skilled. Retail for one of these airbrushes is around $136 but I have seen it on Amazon regularly at around $100 which is a nice savings. This also comes with a machined metal cap for the paint cup which is nice when you’re holding the airbrush at odd angles for some of those more fiddly models.
I want to note that I have an older model of this airbrush that is no longer available and it has a solid handle back piece as opposed to the current models which have a really nice cutaway designed to help you control your paint flow. About a year ago I noticed that the trigger action had worn down on this and it wasn’t as smooth as it had been so I gradually moved away from this airbrush and tried some others out.
Badger Sotar 2020F-2 Mini Review

The Badger Sotar 2020 -F2 Airbrush is a high precision, user friendly, budget friendly (when purchased on sale) tool. I highly recommend this one
The Badger Sotar 2020F-2 is my current go-to airbrush. This is also a dual action gravity feed model. The designation F stands for Fine and they’re not kidding, this needle is .19mm and will allow you to get some really precise freehand work in. It also has a very fine adjustment dial at the back end so that with properly thinned acrylics or inks and good air control you can make some “hair” thin lines if needed (but believe me, this takes some practice!). The -2 designation is the paint reservoir size and you’ll want to make sure you’re getting that model as it has decent sized 1/12 ounce paint cup. The -1 model is designed for illustrators and the reservoir is actually built in to the airbrush body to facilitate one drop at a time ink usage, you’ll want to avoid this as it won’t hold enough paint for most of the tasks you’re going to be doing.
The Sotar 2020F comes apart easily for cleaning and maintenance and parts are readily available online and direct from Badger – who coincidentally have great customer service. This airbrush kit includes an extra Fine sized needle and a wrench for maintenance. Retail on this airbrush is an astounding $422 but I have to tell you I have NEVER seen it for sale anywhere at this price. They seem to mostly show up in the $200 range if you see it in a shop. However the Badger Sotar 2020F is on sale pretty frequently on Amazon for right around $100 which makes it an incredible value for the level of precision and control it gives you. I highly recommend this one but don’t over pay, wait for a sale!
Grex Tritium TG3/TG2 Pistol Style Airbrush Mini Review
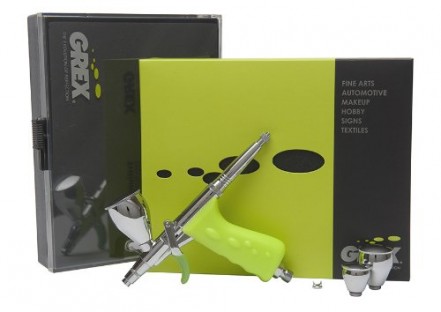
The Grex Tritium TG2/TG3 Pistol Grip style airbrush. Another great choice with lots of well executed design features
I’ve saved the Grex Tritium TG2 for last because even though it is another dual action, gravity feed airbrush it is a beast of a different nature. Unlike the other airbrushes I’ve talked about that have a top mounted trigger that you push down and slide back, this one has a pistol grip and trigger style control assembly. This means that when you engage the trigger you’ll feel that it moves back about half of its travel and then sort of stops/hesitates. The first half of the trigger pull is when the air starts to flow and as you pull the trigger back farther paint starts to flow out (this sounds weirder when I describe it than it actually feels when you use it). This is an entirely different feeling action than what you’re used to if you previously used a regular airbrush but it’s actually a pretty natural feel and becomes very comfortable after you use it for a bit.
The Grex Tritium series has some very well thought out design features that I really like. First the nozzle and needle sets come packed together and are easily changed out. TG2 is the designation for the .2.mm needle and nozzle kit and TG3 is the .3mm needle and nozzle kit. This airbrush also has interchangeable color cups in three different sizes and all three cups include a lid. These cups thread on so they won’t work loose while you’re working. Another great design feature is that nozzle guard/crown tip. These are actually magnetic and will also stick to the back end of the airbrush if you need to change them while painting for those times you’re doing detail work and need to get in really close to the surface you’re painting. While it takes some getting used to if you’re switching from a standard airbrush setup to this pistol grip style it really works well and allows you to do some fine detail work and I think that for me at least the pistol style grip and trigger is less fatiguing during long painting sessions. This kit comes in a plastic carrying case and includes the 3 different sized cups, a regular nozzle cap, a crown cap and a wrench,
The Grex Tritium is pricier than the competition but I think it’s due to the well thought out and improved design features that it has. Keep in mind that it includes extra color cups with lids and a crown cap which other airbrushes do not include in the basic set up. Retail for this airbrush is $299 but it is usually available for right around $200 online. For the extra accessories you get and the nifty design ideas I think it is a good value even though it’s a pricier choice.
The Not So Final Word on Airbrushes for Hobbyists and Modelers
This is intended to be a basic overview of airbrushes and their various features. I’ve also posted some comments about airbrushes I have used and am still using. It is by no means an exhaustive list and I am not a “tool collector” either so you won’t see me buying and opining on every airbrush that’s out there. Let me also say that what works for one person may not work for another. Realistically there is no “be all, end all” airbrush because there’s a learning curve that comes with airbrushing as well as some trial and error for most folks. I am confident telling you not to buy a cheap “starter airbrush” with the intent to try it out for awhile and move up to something expensive. You’ll most likely find yourself frustrated by the limitations of cheap tools and may give up entirely if you have some bad experiences. You’re better off buying a good airbrush and growing in to it as your skills improve.
There’s a lot to learn about airbrushes and in the next few articles I’ll cover a broad range of subjects related to airbrushing.. Next up will be an article about compressors and related hardware and after that I’ll talk about all of the various accessories and airbrush odds and ends that you’ll find handy to have around.
As always, comments and constructive feedback are welcome. Feel free to add something in the comment section below but please keep things civil.

