Feb 062015
 
Here's an airbrush with the main parts labeled so that you can get familiar with the terminology

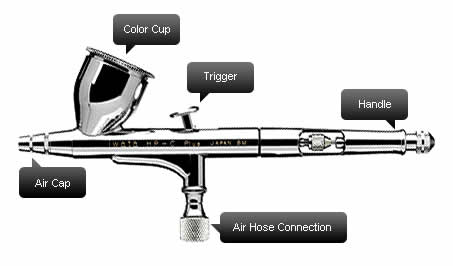
Here’s an airbrush with the main parts labeled so that you can get familiar with the terminology

I’ve been thinking about airbrushes a lot lately and there’s been increasing discussion on some of the various hobby groups and boards I participate with or lurk on. The discussion usually starts with someone asking what specifically they should buy or do when they’re starting out with airbrushing. This is a pretty interesting subject and I’ve got a fair amount of experience with it so I thought I’d share a bit of what I know with you all. After I started writing about airbrushes I realized that there is so much to talk about that it would probably be better if I broke this up into a series of articles rather than one ginormous TLDR post. What I’ve decided to do is to turn this into at least a three part series where I’ll cover airbrush basics and my recommendations on specific airbrushes based on my experiences in part one. Part two will cover compressors, hoses and other related hardware and finally, part three will cover necessary and optional accessories – things that I find handy to have around when airbrushing.

Before we really get rolling here I want to mention a couple of important things. First, through this entire discussion I’m going to talking about airbrushes and painting using Acrylic water based hobby paints. These are the same type of paints you’ll typically use for brush painting miniatures and hobby models, brands like Vallejo, Reaper, Games Workshop, etc. I don’t use enamels or lacquers at all so the information presented here may not be suitable for people using those types of paints. Second, if you’re thinking that getting an airbrush will magically make you a master painter as soon as you hook everything up and start spraying paint, well, stop thinking that. Airbrushing will allow you to do a lot of neat stuff and get really nice finishes but it comes with its own set of problems and learning curve. Like any other skill, you’ll need to put the time and effort in to master your craft and fully take advantage of what an airbrush can offer you. Lastly, all airbrush paints are different and most will need to be appropriately thinned in order to spray them with an airbrush. Even the ones that are pre-thinned or labeled “air” paints will sometimes need extra thinning or benefit from some tinkering. I’ll cover this at a later date in a separate article.

The Basics – Airbrush Feed Types

There are three types of feeds for airbrushes. The feed type describes how your airbrush moves paint from the reservoir through the brush body and out the nozzle as you paint. These types of airbrush feeds are Siphon Feed, Side Feed, and Gravity Feed.

Siphon Feed Airbrush

A typical Siphon Feed airbrush

Siphon feed means that the reservoir is connected to the airbrush via a spigot under the body. The reservoir is typically a jar with a screw on lid that has an integral hose/pickup tube that sucks paint up into the airbrush when you press the trigger. This style of airbrush is good for moving large volumes of paint which makes it good for terrain or base coating larger models but will generally not be precise enough for detailed work. To be honest this isn’t much better than using a rattle can so I don’t really recommend this style of airbrush for miniatures. (Rattle can = commercially available aerosol spray paint cans with a ball agitator inside that rattles around when you shake it up)

side feed airbrush

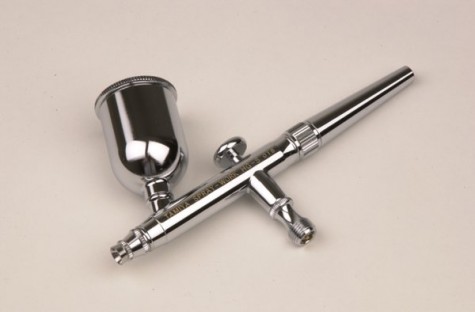
A Side Feed airbrush, this one only allows you to mount the color cup on one side

Side feed airbrushes have the spigot or attachment point for the reservoir straight off the side of the airbrush body so that the paint reservoir sits parallel to the body. These typically have a paint cup and some can be attached to either side of the airbrush which is helpful for left/right hand users. This airbrush style is used a lot by illustrators but in my experience isn’t that great for people doing models or miniatures as the cup seems to always make using this style of airbrush awkward because of the widely varying surfaces and angles you encounter when painting small models.

gravity feed airbrush

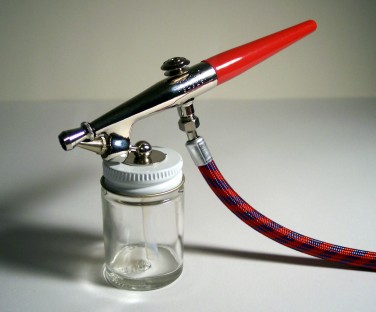
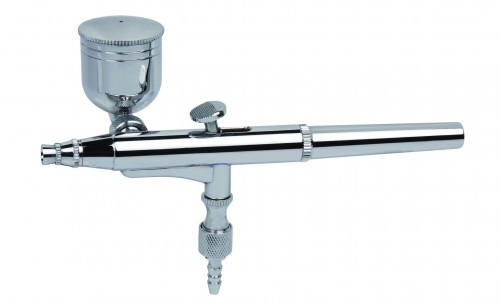
Gravity Feed airbrush with a fairly large reservoir/color cup

Gravity feed airbrushes have the paint reservoir attached to the top of the airbrush right on the barrel. Paint goes in the cup and when you press the airbrush trigger paint flows into the air stream and out the nozzle. Gravity feed airbrushes, in my opinion, are the best choice for painting models and miniatures because they require lower air pressure to operate and allow you more control over the amount of paint coming out of the nozzle. (You can really thin down paints or use inks and dial down the air pressure to get very fine lines when using this type of airbrush).

Gravity feed airbrushes will sometimes be manufactured and sold with different cup sizes or interchangeable cups so make sure you know what you’re getting before you purchase. I tend to favor the medium size cups although a large cup is handy if you’re base coating something large or assembly- lining a bunch of miniatures.

Airbrush Action Types

Airbrush action refers to what happens when you press the trigger on the airbrush. There are two kinds of airbrush action, single action and double action. Single action airbrushes are the spray guns of the airbrush world. This means that when you press the trigger it operates the same way a rattle can works – paint and air flow out of the nozzle all together. You don’t get to decide how much paint comes out when you press the trigger, it’s all or nothing. For this reason you should avoid a single action airbrush.

A double action airbrush has a two stage trigger system. The trigger moves up and down as well as traveling front to back. This means when you depress the trigger you get airflow without paint and as you slide the trigger back towards you, the paint starts to mix with the air and flow through the nozzle. The further back you slide the trigger, the more paint flows through the nozzle. This allows you a great deal of control over the paint and air mixture enabling you to go from a large flow of paint for broad coverage to fine lines when you need to hit some small details. This does take some getting used to and you’ll need to practice controlling your paint this way but eventually it becomes fairly intuitive. I absolutely recommend you get a double action airbrush.

Airbrush Needle and Nozzle Sizes

Airbrushes come in a variety of needle sizes and you usually find that they have a matching nozzle that either comes packaged together with the needle or will need to be purchased along with it. Needle sizes are usually defined in millimeters, like .21mm, .35mm, .5mm etc. The larger the number, the larger the coverage with that needle and nozzle set.

The largest needles that you’ll be interested in are the ones around 5mm but you really only want to consider this for areas where you need to put down a lot of paint as you won’t be able to do fine detail work with this size range of needle.

Going down a bit from the largest are the .3mm – .35mm “mid range” size of airbrush needles. These are pretty good all around sizes and will allow you to base coat and do some detail work, stripes, checks, camo patterns, etc.

Lastly for our purposes is the range of needles that fall around .20mm to .25mm. This size range is going to give you some really fine lines and allow you to do some nice freehand work. You can also do some base coating with this size but you’ll need to have everything cranked up so you can get the coverage you want. This size range is what I typically recommend because while it may feel a bit overwhelming when you first start out, if you do even a moderate amount of airbrushing you’re going to grow into this fairly quickly. You’ll be able to take advantage of the fine control you already have rather than buying a less capable “starter” airbrush and then needing to replace it a few weeks or months later.

So What Kind of Airbrush Should I Buy?

To sum up you’re going to be looking for an airbrush that is Gravity Feed, Double Action, and .20mm to .30mm needle and nozzle size. Next we’ll take a look at some different airbrushes and I’ll share my thoughts with you based on my experiences with some that I own or have used.

Airbrush Reviews and Recommendations

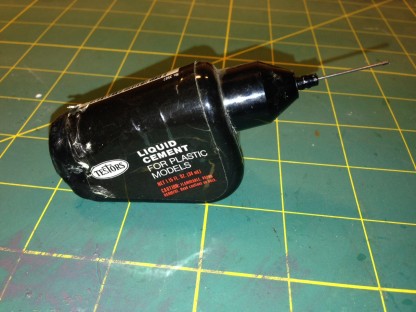
I’ve been using airbrushes for close to 30 years but not continuously during that time so it’s been sort of a weird learning curve. I started like a lot of people probably did all that time ago – with a cheap plastic hobby shop single action siphon feed brush that was basically akin to a rattle can that you could change colors with. This came with a thin plastic hose and an adapter that allowed you to attach it to a canned air source. This is probably the worst way you can start and I bet that a fair number of hobbyists never get any farther than this because it’s a big dumb ungainly set  that doesn’t give you any of the control or benefits of a quality airbrush set up. I’m pretty sure you can still find these Testors brand airbrush kits at places like Michael’s or other craft and hobby stores. Avoid these, you’re going to waste a lot of time fiddling with this and no matter what, you’ll never get fine detail work out of one. On top of that, canned air is ridiculously expensive and wasteful. At $12 to $14 per can of air, it’s likely that by the time you learn to get any decent results with this setup you will have spent enough money on canned air to have purchased an actual airbrush compressor.

Having owned and/or used several different airbrushes I feel very comfortable recommending the following three. These are quality products backed by reputable companies. The airbrushes, accessories and parts are all readily available at good hobby shops and online. Here are my top three recommendations:

Iwata HP C Plus Airbrush Mini Review

Iwata HP-C Plus Airbrush

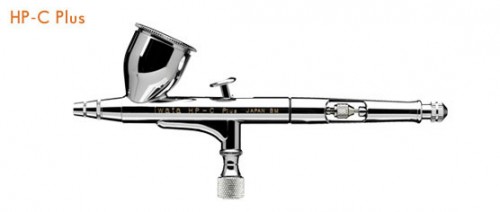
The Iwata HP-C Plus Airbrush is a solid, high quality dependable workhorse that will take you a long way

When I finally decided to get serious about airbrushing – about 10 years ago – I made the jump from a Badger series 150 to the Iwata HP-C Plus airbrush. It was a huge step up in quality and control. This airbrush is a high performance, high precision workhorse and has served me well. It is dual action, gravity feed and has a nice 1/3 ounce color cup. These can be purchased with either a .3mm or .2mm needle and nozzle and you can swap them out if you decide to start with the larger size and work your way down as you become more skilled. Retail for one of these airbrushes is around $136 but I have seen it on Amazon regularly at around $100 which is a nice savings. This also comes with a machined metal cap for the paint cup which is nice when you’re holding the airbrush at odd angles for some of those more fiddly models.

I want to note that I have an older model of this airbrush that is no longer available and it has a solid handle back piece as opposed to the current models which have a really nice cutaway designed to help you control your paint flow. About a year ago I noticed that the trigger action had worn down on this and it wasn’t as smooth as it had been so I gradually moved away from this airbrush and tried some others out.

Badger Sotar 2020F-2 Mini Review

Badger Sotar 2020-F2 Airbrush

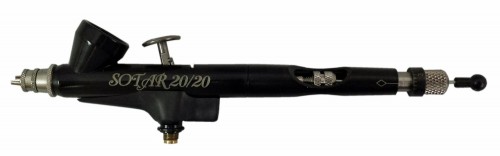
The Badger Sotar 2020 -F2 Airbrush is a high precision, user friendly, budget friendly (when purchased on sale) tool. I highly recommend this one

The Badger Sotar 2020F-2 is my current go-to airbrush. This is also a dual action gravity feed model. The designation F stands for Fine and they’re not kidding, this needle is .19mm and will allow you to get some really precise freehand work in. It also has a very fine adjustment dial at the back end so that with properly thinned acrylics or inks and good air control you can make some “hair” thin lines if needed (but believe me, this takes some practice!). The -2 designation is the paint reservoir size and you’ll want to make sure you’re getting that model as it has decent sized 1/12 ounce paint cup. The -1 model is designed for illustrators and the reservoir is actually built in to the airbrush body to facilitate one drop at a time ink usage, you’ll want to avoid this as it won’t hold enough paint for most of the tasks you’re going to be doing.

The Sotar 2020F comes apart easily for cleaning and maintenance and parts are readily available online and direct from Badger – who coincidentally have great customer service. This airbrush kit includes an extra Fine sized needle and a wrench for maintenance. Retail on this airbrush is an astounding $422 but I have to tell you I have NEVER seen it for sale anywhere at this price. They seem to mostly show up in the $200 range if you see it in a shop. However the Badger Sotar 2020F is on sale pretty frequently on Amazon for right around $100 which makes it an incredible value for the level of precision and control it gives you. I highly recommend this one but don’t over pay, wait for a sale!

Grex Tritium TG3/TG2 Pistol Style Airbrush Mini Review

Grex Tritium TG3 Airbrush

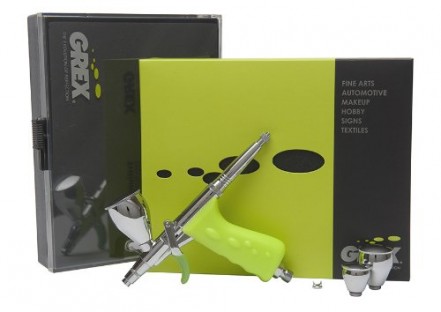
The Grex Tritium TG2/TG3 Pistol Grip style airbrush. Another great choice with lots of well executed design features

I’ve saved the Grex Tritium TG2 for last because even though it is another dual action, gravity feed airbrush it is a beast of a different nature. Unlike the other airbrushes I’ve talked about that have a top mounted trigger that you push down and slide back, this one has a pistol grip and trigger style control assembly. This means that when you engage the trigger you’ll feel that it moves back about half of its travel and then sort of stops/hesitates. The first half of the trigger pull is when the air starts to flow and as you pull the trigger back farther paint starts to flow out (this sounds weirder when I describe it than it actually feels when you use it). This is an entirely different feeling action than what you’re used to if you previously used a regular airbrush but it’s actually a pretty natural feel and becomes very comfortable after you use it for a bit.

The Grex Tritium series has some very well thought out design features that I really like. First the nozzle and needle sets come packed together and are easily changed out. TG2 is the designation for the .2.mm needle and nozzle kit and TG3 is the .3mm needle and nozzle kit. This airbrush also has interchangeable color cups in three different sizes and all three cups include a lid. These cups thread on so they won’t work loose while you’re working. Another great design feature is that nozzle guard/crown tip. These are actually magnetic and will also stick to the back end of the airbrush if you need to change them while painting for those times you’re doing detail work and need to get in really close to the surface you’re painting. While it takes some getting used to if you’re switching from a standard airbrush setup to this pistol grip style it really works well and allows you to do some fine detail work and I think that for me at least the pistol style grip and trigger is less fatiguing during long painting sessions. This kit comes in a plastic carrying case and includes the 3 different sized cups, a regular nozzle cap, a crown cap and a wrench,

The Grex Tritium is pricier than the competition but I think it’s due to the well thought out and improved design features that it has. Keep in mind that it includes extra color cups with lids and a crown cap which other airbrushes do not include in the basic set up. Retail for this airbrush is $299 but it is usually available for right around $200 online. For the extra accessories you get and the nifty design ideas I think it is a good value even though it’s a pricier choice.

The Not So Final Word on Airbrushes for Hobbyists and Modelers

This is intended to be a basic overview of airbrushes and their various features. I’ve also posted some comments about airbrushes I have used and am still using. It is by no means an exhaustive list and I am not a “tool collector” either so you won’t see me buying and opining on every airbrush that’s out there. Let me also say that what works for one person may not work for another. Realistically there is no “be all, end all” airbrush because there’s a learning curve that comes with airbrushing as well as some trial and error for most folks. I am confident telling you not to buy a cheap “starter airbrush” with the intent to try it out for awhile and move up to something expensive. You’ll most likely find yourself frustrated by the limitations of cheap tools and may give up entirely if you have some bad experiences. You’re better off buying a good airbrush and growing in to it as your skills improve.

There’s a lot to learn about airbrushes and in the next few articles I’ll cover a broad range of subjects related to airbrushing.. Next up will be an article about compressors and related hardware and after that I’ll talk about all of the various accessories and airbrush odds and ends that you’ll find handy to have around.

As always, comments and constructive feedback are welcome. Feel free to add something in the comment section below but please keep things civil.

Images: 1 2 3 4 5

Missed Opportunities: SWTOR’s Gambling Problem

 News and Info, Online Gaming, SWTOR  Comments Off on Missed Opportunities: SWTOR’s Gambling Problem
Jul 022014
 
swtor 2.8 spoils of war in game gambling

This kid doesn’t think much of SWTORs gambling implementation either

SWTOR Game update 2.8 “Spoils of War” was deployed a few weeks ago and while I wasn’t able to get in and play a lot right when the patch first dropped I have had some time in the last week to do some serious credit destruction. Here are my thoughts on this event.

SWTOR Update 2.8: Spoils of War

Update 2.8 brought about a few changes and features and of course the casino event. For completeness sake I’ll list the major features here:

  • Double Rewards for PvP and GSF
  • NIM Dread Palace
  • Group Finder Changes for Story Mode Ops
  • An assortment of mostly minor class changes
  • Bounty Contract Week & Relics of the Gree

You can check out the complete list of SWTOR 2.8 Patch Notes here.

I’ll be honest with you, I don’t PvP much and I don’t do any serious raiding at this point so none of these changes really feel monumental to me although I do like the changes to the Story Mode Ops Group Finder as I occasionally am up for those. Bounty Contract Week….eh, well. I think BioWare seriously needs to revisit this event at this point as most players that have been around for awhile seem pretty ambivalent about this now. Same for Relics of the Gree.

The Housing is Coming But We Want You to be Broke When it Gets Here Event

First off, I’m not sure we can really call this an event. I mean, yeah the content is supposed to be for a limited time and BioWare has to call it something but can we really call what is clearly intended to be a means for BW to manipulate the economy by taking a significant amount of credits out of the system an “event”?

To be clear, I don’t really have any problems with the attempt to manipulate the economy. MMO economies tend to suffer from rampant inflation. I have no doubts that this is an ongoing issue in most persistent universe games and that devs spend a fair amount of time analyzing this and trying to determine how best to deal with it without driving players crazy (well, crazier than we all tend to be about changes made to the games we play on a regular basis).

I also don’t have any problems with the idea of gambling or casinos in online games. I think when it’s well executed it can be fun. Herein lies my problem with SWTOR’s gambling event. It is neither fun nor well executed. In fact I’ll go on record as saying this may be the laziest implementation of an in game gambling system I’ve ever seen.

star wars, swtor, gambling, game update 2.8, spoils of war

If only those were space fruits and Gungan heads…with lightsabers through them.

For the uninitiated, you can pick up a mission on your fleet station that will send you to your factions casino on Nar Shaddaa. They start you off with five free Smugglers Chips (first taste is free, right?) and send you to a bank of slot machines where you can spend the chips to try and get gold certificates which can be traded for event gear or more importantly the elusive Kingpin Chip that can be used at Kingpin slots which reward speeder mounts, a Rancor mount or more golden certificates. You can of course buy both Smuggler and Kingpin chips from conveniently stationed casino droids but you’re better off just buying the Smugglers chips and converting them to Kingpin chips via the gambling mechanic. (If you’re a numbers person and want to know the specific odds of winning, check out Dulfy’s here where there is a breakdown of rewards and odds)

Gambling in SWTOR feels very slapdash. There is nothing actually entertaining about it either (aside from observing player behavior, which is remarkably similar to real life degenerate gambler behavior that I’ve witnessed during trips to Las Vegas). When you click on the machines you get a spinning wheel and after a few seconds either a red or green light indicating whether you’re a winner or on your way to bumming the price of a ticket off of Nar Shaddaa from a sympathetic player.

Occasionally you’ll get a song and fireworks indicating you’ve won something better than chips or rarely your machine will explode giving you an achievement. A few minutes of this becomes mind numbingly boring. Don’t get me wrong, I’m not griping about the win percentage or the prizes. Those seem pretty much in-line for what I would expect out of something like this. (Although I have to agree with some folks in the SWTOR Twitter community that this games RNG mechanic doesn’t really feel like it’s truly RNG. It seems super streaky at times and this doesn’t just apply to the gambling mechanic, it’s noticeable when you’re crafting and reverse engineering as well).

BioWare chose to go the easy route and give us the equivalent of slot machines for its first foray into making the casinos places that you can actually gamble away your credits and self respect (and if you’re wondering, slot machines in Star Wars are legit. They’re called Lugjack machines). Yeah I would have liked Pazaak or even a Jubilee Wheel but I also get that this is BioWare’s first attempt to implement gambling and is probably a bit of an experiment. What’s really bothersome is that they weren’t willing to put enough resources into this to make it even sort of interesting to watch while you’re standing there for hours grinding credits trying to get a Rancor. Where are the spinning reels with space fruits or Gungan heads or even Aurebesh characters? Come on BioWare, I had slot machine games on my Atari 2600 30 years ago that were more inspired and creative than what you’ve foisted on your players. This implementation was quite frankly the laziest lazy that ever lazied.

star wars, swtor, gambling, game update 2.8, spoils of war

Even this would have been a more entertaining visual than what we got for slot machines from SWTOR

Opportunity is Knocking but BioWare Can’t Hear it Over the Sound of Jangling Cartel Coins

What’s really disappointing is that this feels like another missed opportunity by the SWTOR design team. Nar Shaddaa is supposed to be a hub of commerce and activity (legitimate or otherwise) and we already know that player housing is going to be implemented there. I think BioWare should also add services to Nar Shaddaa that are similar to what is found on the Fleet Hubs.

With a little more effort, they could have made even this simple slot machine gambling implementation entertaining. This could have been the start of making the casinos places for players to congregate and socialize, places that players would actually want to go to and hang out at. The Casinos are already attractive areas that seem like a ripe opportunity to turn into a hub of player activity. Instead what we have is a grindy boring pit stop where players will only stay long enough to get their reward and likely never return to once they’ve gotten what they came for.

Thanks for stopping by and if you have any comments feel free to leave them below or you can hit me up on Twitter @HolyCrapItsLate

Images: Two, Three

Hobby Tip: Improve Your Miniature Painting Today With a Wet Palette

 Hobby Tradecraft, News and Info, Tabletop Gaming  Comments Off on Hobby Tip: Improve Your Miniature Painting Today With a Wet Palette
Jun 192014
 

I get a lot of questions about painting miniatures, specifically about things that new miniatures painters can do to improve the quality of their paint jobs. In my opinion there are three really important things that you can do to help yourself out. These are (in no particular order), brush control – which comes with practice, learning to thin your paints, and painting from a wet palette. Of these three I think using a wet palette is something any painter can do that is low cost and will have an immediate and significant impact on the quality of their miniature painting. Today I’m going to talk about wet palettes.

(Before we dive in I want to be clear that we’re talking about using water based acrylic paints here like Vallejo, Games Workshop, Reaper, etc)

Just What Is a Wet Palette and Why Do I Need it to Paint Miniatures?

Improve your miniature painting with a wet palette, hobby, tabletop

The wet palette in all of its simple, inexpensive yet supremely helpful glory

The default for most new miniature painters is to use a brush to get paint straight from the pot and to slather it on to your miniatures. This leaves a less than desirable finish as you tend to get the paint on very thick and it obscures some details. There are a lot of things wrong with this approach and I don’t want to get sidetracked so I’ll just say “don’t do that” in this article and leave it at that for now. We’ll revisit that topic in another post in the near future.

Some miniature painters may know not to dip brushes straight into the pot or they may be using paint that’s in dropper bottles so they’re using some sort of palette. Maybe one of these plastic ones or a piece of ceramic tile or even an old salad plate. This is a step in the right direction but you can do better. You can use what’s called a wet palette.

This is  a pretty typical multi well plastic palette. You should keep one around for special applications that you don't want on a wet palette, like washes.

This is a pretty typical multi well plastic palette. You should keep one around for special applications that you don’t want on a wet palette, like washes.

A wet palette is exactly what it sounds like, a surface to load and mix paints on but the difference is that it’s actually wet. This is accomplished by having a container with a sponge on the bottom that’s loaded with water and some paper on top of the sponge. This can be either special wet palette paper or some stuff you probably have around the house – more on that in a minute.

Using wet palettes will give you several key advantages. First of all when you load paint on to the wet palette it immediately sucks up a little water through the paper and thins out the paint. You’ll have a base to start from and then can experiment with the paints you’re using to find the right consistency. In some cases you won’t need to thin it any further, but this varies by manufacturer and even by color within a brand of paint.

wet palette, paint, miniatures, hobby, tabletop,

A few dabs of water based acrylic paint on the wet palette. Note how it’s starting to spread a little as it picks up a bit of water – this is good!

Since your paints are now resting on a layer of moisture they will stay wet much longer than if you’d just loaded them onto a regular dry palette. This also means that you can leave paint on the wet palette, close it up and come back a few days later and your paint will still be wet and useable. (If you leave it there long enough it will separate some so you’ll need to give it a stir to rejuvenate it). An added bonus is that if your paint is in open pots they’ll last longer because you’re only opening the pots long enough to get some paint out. There is less exposure to air and less evaporation of the moisture in the paint pot thereby extending the life of your paint in the pots.

Using a wet palette also means you can combine paint colors side by side to get different gradients and blends when you’re shading. Also, if you’ve mixed up or blended a custom color you’ll be able to preserve that between painting sessions as it will stay wet when stored in the wet palette saving you time and the headache of remembering just what you did to arrive at that color you mixed up.

blending paint on a wet palette, tabletop, miniatures, hobby

This is just a quick (and sloppy) example of blending paint on your wet palette and it’s not completely blended together so you can get the idea of what I’m doing here… You can see how you can work up different color gradients easily this way

Where Do I Get a Wet Palette?

You can buy a complete wet palette that’s an airtight container, sponge and special paper for around $10 to $20. There are these Masterson Sta–Wet palettes which run around $10 or so at art stores like Michael’s, Hobby Lobby, etc. Or you can get one of these Privateer Press P3 Wet Palettes for around $20 at your FLGS or shipped right to your door from Amazon if you don’t have a local game store.

The P3 Wet Palette, usually  under $20 and perfect if you don't want to  build one yourself.

The P3 Wet Palette, usually under $20 and perfect if you don’t want to build one yourself.

If you’re on a budget or like to do stuff yourself you can easily build a wet palette, probably with stuff you already have around the house.

How Can I Build My Own Wet Palette?

This is actually a pretty simple project that you can do in less than an hour. You’ll need to assemble the following items:

Airtight container – Tupperware, Glad or Rubbermaid containers. This can be glass or plastic, whatever you have as long as it’s got a good seal. Use a size that you’re comfortable with and have room for on your work surface. I use a sandwich sized box for my wet palette.

Sponge or some foam – You can use a sponge or even some of the foam that comes in miniatures blister packs packages. You want to cut this into the shape of your container so that it’s an even layer across the bottom. If you don’t have a sponge you can also use paper towels. Use a couple and fold them up so they fit in your container. Trim as needed. (Here’s a link to some purpose made Masterson Sponges)

Parchment paper – If you don’t know what this is, ask your wife or s/o (or mom). It’s also called baking paper. This is different from wax paper. (You can use wax paper in a pinch but I don’t recommend it. Parchment paper just has different properties for passing moisture through it and is significantly better for this application) If you don’t have any parchment paper look in the grocery store section where they sell plastic wrap and aluminum foil, you’ll find it there and it costs around $3 for a box that will last you a LONG time.

Water – this can be tap water but if your water is hard/has high mineral content then use some distilled water. Bonus: you need to wash the sponge and change the water occasionally, using distilled will keep the water from getting funky longer and is better in your paints anyway.

make a wet palette, tabletop, hobby, miniatures, painting

This is all you need to make a wet palette. An airtight container, a sponge or foam, some parchment paper and some water. Simple and cheap!

Here’s how you make your wet palette. Dampen your sponge. This is because if you use a dry sponge it will swell when you wet it and expand. Just run water on it and then wring it out so it’s the size it will be when wet. Turn your container upside down and lay it on your sponge so you can trace around it (assuming you’re using a sponge or foam that’s larger than your container). Trace around and then cut out your sponge or foam – cut inside the lines of the dimensions of your container, this doesn’t have to be perfect but it should be reasonably close.

wet palette, tabletop, miniatures, hobby, painting

I used a piece of foam from some packaging or an old miniatures case. You can use a sponge or even folded layers of paper towels for your wet palette

Next tear off a half dozen or so pieces of parchment paper that will fit in your container. It’ll probably be twice as long as your container if you’re using something like a sandwich sized box. If that’s the case just fold it over so you have a pad of parchment paper. When you cut it to fit the shape of your container make sure you cut the folded part off so all the sheets are loose. Lay your container on the stack of paper and trace it. Cut the paper along the inside of the line you traced so it fits in the container nicely. You will now have enough pre-cut parchment paper to last you awhile.

wet palette, hobby, miniatures, tabletop, painting

Here’s the parchment paper cut out roughly in the shape of my container. It doesn’t have to be exact. Trim so it lies flat on the sponge.

Next up put the sponge in the container, and fill it with water to the top of the sponge. Lay a sheet of the parchment paper right on the sponge and it will absorb some of the water but reach a sort of equilibrium where it’s wet but doesn’t disintegrate or pass a lot of water through. This is the surface that you’ll load with paint and dip your brush into when loading it.

One last trick here – you can actually store few sheets of the pre-cut parchment paper under the sponge so that they are pre-wet when you’re in the middle of a painting session and need to change the parchment out because you’ve used it up.

A Wet Palette Will Help You Become a Better Miniature Painter

wet palette, hobby, miniatures, tabletop, painting

Good miniature painting is something that takes trial and error and lots of practice. Using a wet palette isn’t a shortcut but it is one of the few things that will be a total game changer for you and your painting. It’s also something that really delivers a lot of bang for your buck. When someone asks me how they can improve the first thing I ask them in return is “are you using a wet palette?”. If they’re not then this is always my first recommendation and invariably people get immediate, positive results.

As always, feel free to leave a comment below, I’d like to hear from you an appreciate constructive discussion.

Jun 052014
 

You’ve probably realized that miniatures hobbyists are a fairly diverse group and while there are a lot of tried and true tricks of the trade there’s also a lot of varying opinions about how to get things done. One thing that the entire community is in agreement on though, is that you need good lighting and lots of it when you’re working on miniatures and models. Particularly so when painting.

One bit of advice that’s often repeated is that you should be using a daylight bulb in your lighting setup. This gets mentioned a lot but unfortunately no one usually bothers to explain what exactly a daylight bulb is and why you should use one. Today we’re going to do just that.

Just What the Heck is a Daylight Bulb Anyway?

This is probably the reaction some people have when hearing the phrase "daylight bulb" for the first time...

This is probably the reaction some people have when hearing the phrase “daylight bulb” for the first time…

The term “Daylight bulb” usually refers to the actual lamp in your desk light, in particular the color temperature or Kelvin (K) value. Without getting overly technical here we’re not talking about the wattage of the bulb but the actual color temperature of the light that the bulb gives off.

All bulbs have a K rating. Bulbs with a lower K rating will give off a more yellow colored light. As you go up the K rating scale the light becomes bluer and brighter. Your typical CFL light bulb around the house is probably in the 3000K to 4000K range. These typically have labels like Soft White, Warm White or Cool White. Candlelight is around 2000K or less, with the older incandescent bulbs coming in around the mid 2000’s.

Here's a reasonable example of what the  Kelvin (K) rating actually indicates over its range when it comes to light bulbs

Here’s a reasonable example of what the Kelvin (K) rating actually indicates over its range when it comes to light bulbs

At the other end of the spectrum we have bulbs that are considered Natural Light and these clock in around 5000K. Daylight bulbs are typically right around 6500K and simulate the suns light at mid day on a slightly overcast day. When people refer to Daylight bulbs this is the sweet spot (6500K) although you will see some bulbs marked as Daylight that are around 6000K.

Why Should I Care About Daylight Bulbs?

Are feeling kind of like Homer when it comes to Daylight bulbs? Don't worry, it'll all make sense in a minute!

Are you feeling kind of like Homer when it comes to Daylight bulbs? Don’t worry, it’ll all make sense in a minute!

There are several advantages to using Daylight bulbs. They give you close to ideal natural light so that the colors you are seeing aren’t distorted by the typical yellowy light source found in most homes and office or desk lamps. Daylight bulbs are commonly used by artists and designers who need to see colors in as close to natural lighting conditions as possible. This will help you accurately reproduce the colors you want when you’re painting miniatures, model kits and scenery.

Daylight bulbs will appear brighter even though they may be the same wattage as a lower K rated bulb. This will help you pick out details and see things better when you’re working on the small details and things like mixing and blending or shading paints.

Lastly, working under Daylight bulbs is actually easier on your eyes. This will allow you to work longer and with less eye strain than with more yellow, lower K rated lighting.

Where Do I Get Daylight Bulbs?

Ok, sounds good. Where do I find Daylight bulbs?

Ok, sounds good. Where do I find Daylight bulbs?

The nice thing about Daylight bulbs in 2014 is that they’re readily available. Finding these used to be kind of a hassle but over the last few years finding Daylight bulbs in a variety of packages has become fairly easy. They are available in most sizes of fluorescent tubes as well as CFL bulbs. Most brick and mortar hardware and lighting retailers carry a selection of Daylight bulbs and they can of course be found at Amazon and online specialty lighting shops. You’ll also be pleased to find that Daylight bulbs aren’t typically any more expensive than lower K rated bulbs – and if they are more expensive it’s usually only about a 10 to 15 percent premium. You may even be able to find Daylight rated LED lighting although that is still pretty pricey and not widely available.

Here’s a search results page at Amazon for various types of daylight bulbs.

Have something to add or a helpful tip? Feel free to share it in the comment section below. Thanks for stopping by and see you next time!

Images: 1 2 3 4

May 282014
 

Something that I get asked a lot when I’m talking miniatures is what glue to use for various projects. For a lot of folks coming in to the miniatures hobby, glue is almost an afterthought, something you throw in to the pile of stuff you’re buying at checkout. For others it can be a mystery, meaning they’ve seen a bunch of different glues but aren’t sure what they should use for the miniatures or model kit they just bought. The truth is there are lots of different types of glues and they have different uses depending on what miniatures or models you’re assembling.

Lots of model and miniatures glue

An avalanche of adhesives!

Miniature and Model Glue Basics

Not all model glues are the same, in fact there’s quite a bit of variety. There’s also variety in how these are dispensed or applied. One of the key things when choosing a glue for your project is knowing what material you’re going to be assembling. Different types of plastics and resins will require different glues. Look at the package for the item you’re assembling, some manufacturers will suggest what you need for assembly. If you’re not sure, check the manufacturers website or one of the many forums dedicated to hobby modeling and miniatures. You can also ask the resident expert at your Friendly Local Game Store, he or she will probably be happy to talk to you and answer your questions.

One of the most important rules about using glue is, “less is more”. Use glues sparingly, you want to bond parts to parts and using a thin film of glue will accomplish this. If you get too much glue on your parts you’ll end up gluing large blobs of glue to each other. This will result in a poor bond and the parts not fitting together correctly. Too much glue can also etch or warp the plastic, depending on the material and the glue you are using.

Prepare your miniatures surfaces. There are three keys to preparation: clean, test fit, and surface preparation. Most miniatures and models use a mold release agent to make getting the parts out of the molds an easier process. This release agent can be greasy or powdery. The release agent will interfere with glues and it’ll also prevent paint from sticking to the models when you get to that stage.

It’s recommended that you wash parts in warm soapy water – dish washing liquid is fine for this with plastic and metal models. For resin models you will need to use something more powerful like Simple Green or Fabuloso (I think Fabuloso is the Mexican version of Purple Power, I get it at the local Mexican market. It’s cheaper than the name brand stuff and works just as well). After washing, make sure parts are completely dry before gluing them.

You’ll want to dry fit your parts before applying glue. This just means putting the parts together without glue so that you understand how they fit together, that it’s a tight fit, and that you get an idea of where the best places are to apply glue. Lastly you’ll want to do surface prep like removing any burrs or sprue gates/mold lines that will get in the way of a tight fight or be difficult to access after the parts are glued together. (Sprue gates are the bits where the part is attached to the sprue so that the material can flow into the mold during manufacture.)

Sometimes with very smooth parts it’s a good idea to rough up the surfaces where the parts will join in order to get a better surface for the glue to bond the parts. You can do this with your needle files, small emery boards or even an X-acto knife.

These small sanding sticks/emery boards are really handy for surface prep on miniatures and model kits

These small sanding sticks/emery boards are really handy for surface prep on miniatures and model kits

When applying glue, use a tool that gives you good control of your glue. This can be a needle applicator tip, a brush or even something as simple as a toothpick. As mentioned above you want to apply glue sparingly. Squirting it out of a tube is probably the worst way of applying glue. If tube glue is what you have, squirt a little bit onto some wax paper and then use a toothpick or cheap brush to apply it to the parts.

Types of Glue I Use

I actually have a large assortment of glues because there’s no such thing as “One Glue to Bind Them All”. I’ll go through the types of glue I use and what I use them for. As a general rule you’re going to use model cement for most plastic miniatures and model kits that are made of styrene or ABS. You’ll use Crazy Glue/Cyanoacrylates (aka CA) for resin models and some softer “bendy” plastics – this is where you’ll need to check with the manufacturer if you’re not sure. Those heavy duty large model kits may require some two part epoxy or extra thick CA. Last but not least you’ll want some PVA/Elmers White Glue for basing and scenery materials.

Crazy Glue/Cyanoacrylate (CA)

I have several different types of CA and use each one for different applications. I use a thin CA for general assembly of small resin miniatures and some small metal parts as well. I recommend you get one with a built in brush applicator. The brush gives you a lot of control and allows you to put the CA only where you need it. I recommend Games Workshops “Super Glue Thin” product. It’s easy to find and easy to use. The packaging ensures that the brush comes out of the bottle loaded with a moderate amount of glue and the GW product is widely available at game and hobby stores.

Game Workshop Super Glue Thin is widely available at hobby shops. Loctite also makes a thin superglue with a brush applicator.

Game Workshop Super Glue Thin is widely available at hobby shops. Loctite also makes a thin superglue with a brush applicator.

I also use a thicker gap-filling CA, Bob Smith Industries Insta-Cure+ for spots where I need some extra strength or to fill a small gap. Using a thicker CA can also give you better control of the glue when you’re applying it. CA’s go from very thin all the way up to gel like consistency. You can experiment with these various thicknesses to see which you are most comfortable with. This particular product has a plastic tip that you cut open on first use so just cut the very tip of it off so you have a small opening. If the tip gets gummed up you can buy replacement bottle tops and caps. (Another use for the thicker CA’s is as a gap filler. You can run some thick or gel type CA into a gap between parts and when it sets you’ll be able to sand and finish it so that it completely hides the gap. You can use an Accelerator to speed up the curing process – more on Accelerators below)

Bob Smith Industries Insta Cure+ is my preferred CA.

Bob Smith Industries Insta Cure+ is my preferred CA.

For places where I really need a strong bond, for example, large kits with heavy wings or that have heavy metal add on parts I use Bob Smith Industries IC-2000. IC-2000 is a CA that has had very finely ground black rubber added to it. I have used this to secure things like dragon wings to large metal models and it is very strong. I’ve dropped stuff that is glued together with IC-2000 and the actual metal snaps off close to join but not the joined parts. This stuff is really just for specialized applications but it is handy to have around.

Bob Smith Industries IC-2000

Bob Smith Industries IC-2000

The last two CA products I keep around are BSI Insta-Set Accelerator and BSI Un-Cure Debonder. The Insta-Set is an accelerator. You can use it to speed up the curing process for CA’s but be aware that a bond using accelerator will be less strong than one without. Another use for accelerator is quick curing when using CA to fill a gap. You run a bead of CA over the gap and the spray the accelerator over it to cure it immediately. Accelerator creates a chemical reaction and the by product is heat. This reaction can get VERY hot so be careful about having glue on your skin when using this product. Accelerator can also etch styrene plastic so use it sparingly.

Bob Smith Industries Insta Set Accelerator

Bob Smith Industries Insta Set Accelerator

Un-Cure is a CA debonder. You can use this product to dissolve the bond between parts or remove CA from your skin. Use debonder sparingly as it can soften plastic parts.

CA Tip: The reason CA’s are so good at bonding skin is because that was their original purpose! If you apply some lotion to your hands before working with CA it may help you by making any CA you get stuck to yourself a bit easier to remove. It won’t completely prevent it from bonding to you but may make cleanup a bit easier.

Model Cement and Solvent

There are lots of types of model cement. My biggest issue with this is how you apply it. Because of that I have a favorite product for those just starting out. This product is Testors Model Master Liquid Cement. This product comes with a steel needle tip allowing for very precise and controlled application. This has been my go-to model cement for at least a decade, possibly longer. The tip rarely clogs because it’s steel and any dried glue just peels away. The package does include a couple of fine wire tip cleaners for the rare clog. (There’s a similar Testors product “Quick Dry Cement”. This does not have the steel tip so make sure you get the Model Masters cement.)

The Testors Model Masters Cement with the steel needle applicator gives you great control over the amount and placement of glue on miniature & model parts

The Testors Model Masters Cement with the steel needle applicator gives you great control over the amount and placement of glue on miniature & model parts

The other Testors product I use is Model Masters Clear Parts Cement. This is formulated differently so it won’t etch or fog up clear parts like cockpit canopies or windows. Highly recommend this product as there’s nothing more aggravating that putting a ton of work into a kit and then having the windows get fogged by cement.

Model Masters Cement - this one's got the steel needle applicator tip

Model Masters Cement – this one’s got the steel needle applicator tip

The last type of model cement I use is more of a solvent. It’s very thin and has a brush applicator. I typically lay the brush at the join and allow the glue to wick it’s way in between the parts. This glue actually melts the plastic a bit so that the parts fuse together. I love this stuff because it enables me to get a really good join and a tight fit on parts that have been correctly prepped. I have been using Tamiya Extra Thin and I really recommend this particular product.

Tamiya Extra Thin Cement

Tamiya Extra Thin Cement

Model cements and solvents should be used sparingly as they can warp, soften or etch plastic. Quick tip: the thin cements and solvents are volatile and will evaporate quickly. Use with good ventilation and keep the lid on tight. If you forget to put the lid on you may return to a mostly empty bottle the next day!

2-Part Epoxy

I occasionally use a 2-part epoxy like Devcon or JB Weld. Just be aware of the short working time – I use a five minute epoxy and make sure you mix this thoroughly. I don’t recommend using anything with a quicker setting time than five minutes as you’ll invariably run up against the clock and that can be frustrating. Also, look at the package and see what you need for cleaning this up BEFORE you start mixing. You’ll want to be ready for clean up immediately upon finishing with this product.

PVA aka Elmers Glue

PVA is Polyvinyl Acetate, commonly known as Elmer’s Glue. You’ll want some of this for basing. Thin it slightly with water and apply it to your base with a brush, then add your basing material to the base. Once your basing material has dried completely you can paint a thinned coat of PVA over it to seal it on to the base. Some good alternatives to Elmers are Weldbond and Aleene’s Tacky Glue. Aleene’s can be particularly useful on bases with a slick surface. (Don’t forget that for slick surfaced bases you can also rough them up a bit before applying glue to help give the glue something to bond with).

Weldbond Glue - I keep this around because I use it a lot for large terrain projects as well

Weldbond Glue – I keep this around because I use it a lot for large terrain projects as well

Before we wrap up I want to mention that I have not talked about pinning models in this post at all because that is another lengthy subject that should have it’s own article. I’ll be putting together a guide for pinning models in the near future but in the meantime you can check this article for some thorough information on what you’ll need to have when we talk about pinning models.

As always, the way I talk about doing things and what I use is based on a my own history of building models and miniatures. These are the products I use and the ways I do things but they are by no means the only way of doing things. If you’d like to contribute an idea or an opinion of a product that you like, feel free to do so in the comments section below. Constructive dialog is always welcome here!