Information and recommendations on Airbrush Compressors
Picking up from the last article on airbrush basics I’d like to talk about the other big decision when it comes to entering the airbrush hobby – what to use as an air source. For most of you this will mean some sort of compressor but even with that decision made there are still some considerations on what kind of compressor you should get. Outside of airbrush compressors there are a few other options that include canned air, air tanks and even a spare tire. Lets dive right in and talk about alternate air sources first and then we’ll cover various types of compressors and hardware that goes with them.
Other than an Airbrush Compressor What Can Be Used as an Air Source?

There are lots of questions about airbrush compressors. Lets try and get to the bottom of this!
You have a few options if you just can’t swing an airbrush compressor due to funds or your living situation. The least expensive thing is to get an adapter that will attach to the valve stem on a spare tire. These cost a few bucks and with a fully inflated tire from a pickup truck or passenger car you’ll have enough air to last a lengthy painting session. The caveat of course is that if you decide to use the spare from your car or your spouses car and then don’t have that with you when you need it the cost of dealing with that mistake will likely be greater than if you had just bought a compressor in the first place. Really think about this and weigh the consequences before deciding to go this route. Also consider that tires are generally smelly and dirty and you’ll have to take it somewhere to fill it up occasionally so if you’re planning on having this in your house you may be in for some trouble.
Another solution is the use of canned air like Badger Propel. To be honest this is probably the worst alternative to an airbrush compressor. These cans cost about $12 to $14 each and are a hassle to use. As you use air from these cans they get very cold and the pressure drops. This means you’ll either have to have multiple cans and keep switching them in order to keep airbrushing or you’ll have to warm them up in a bucket of water or come up with some other scheme to keep the cans warm enough so that pressure doesn’t become an issue. At some point with canned air you’ll realize that you’ve spent enough money to have bought an actual airbrush compressor and that’s going to make you angry and frustrated.
Another problem with both of these solutions is that the “regulator” is really just an on/off valve like a water tap. There’s no gauge so you have no way of actually knowing what pressure you’re dialing in and no real control of the air pressure.
One other thing to consider, and this is the best of the three non-compressor solutions in my opinion, is a portable air tank. These are usually available at hardware and auto parts stores but will be less expensive online, particularly if you can get one with free shipping. Portable air tanks vary in size from three to ten gallons typically and online prices for those range from $40 to $60. You’ll need to take this somewhere to fill it just like you would a tire but it’s a lot easier to handle and have around. They hold quite a bit of air and the larger tanks will keep you supplied for several airbrushing sessions. This is a good alternative choice for an airbrush compressor if you need something quiet or if you have a regular shop compressor in your garage to fill it. I recommend getting a regulator for this though as you won’t want to directly connect it to your airbrush.
What Kind of Compressors Can You Use With An Airbrush?
There are several kinds of compressors that are suitable for use with an airbrush. If you have access to a regular shop compressor this will work. You probably won’t want this in the house though because they are very loud so it’s only a good solution in terms of environment if you’re working in a space where you don’t mind the noise, like a garage or dedicated workshop. If you use this kind of compressor you’ll need a manifold and a combination regulator and moisture trap as part of your setup. The manifold is just a splitter so that you can run a dedicated line for your regular high pressure shop air and a line for your airbrush regulator which will allow you to dial down the high pressure your compressor supplies to a manageable range for airbrushing. (Your compressor probably supplies air at 90 to 125 PSI or more and you’re only going to need a maximum of 25 PSI for airbrushing.)
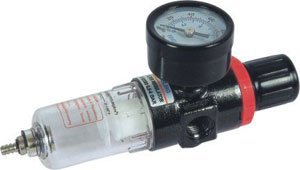
Here’s a typical combination airbrush regulator & moisture trap, perfect for attaching to your shop compressor
Compressors tend to accumulate moisture when they work and this is sometimes ejected out the air line and will foul your paint so you’ll need a water trap to prevent any moisture from reaching your airbrush. You can usually get a combination regulator/water trap for the airbrush side of the manifold.
Do not buy one of these or anything remotely like this. You will be disappointed.
Another type of airbrush compressor you may see recommended is one that is a sealed unit in a small plastic case. These are typically sold to nail artists and cake decorators. You don’t want this. They run constantly, they don’t give you any control over the air pressure and tend to run on the low side pressure wise. This is frequently presented as a budget solution but it just isn’t a very good one. They also tend to pulsate the airflow as you spray which can cause problems with your paints finish. Since they run continuously they also get hot and will sometimes shut down due to overheating.
Finally, we get to dedicated airbrush compressors. These are purpose built small compressors that are designed specifically for airbrushing. These come with or without a tank and run from right around $100 up to and well beyond $500. The good news is, unless you’re a professional artist or have very specific needs due to your living situation there is really no reason to spend much more than $100 on an airbrush compressor.
At the high end of airbrush compressors are specialized, silent compressors. These are very expensive due to the fact that they are almost completely silent. They are designed for heavy usage and usually don’t require any extra hardware like regulators or moisture traps as these features are all built in. The catch is that you pay a very hefty premium for those features and I personally don’t feel that it is worth it for the typical hobbyist who probably spends 10 to 15 hours a week airbrushing, if that. I’ve also seen professional painters state that ultimately these compressors only last for a couple of years even though they are five times the price of a more budget friendly airbrush compressor, and this is coming from professionals who probably run their airbrush compressors 40 or more hours per week, week in and week out.
This brings us to the most common choice for airbrush compressors, the single piston airbrush compressor. These come in both tankless and tank included versions and are your best choice if you’re going to be working inside your house and don’t need to be completely silent. An airbrush compressor without a tank will run continuously, and one with a tank will charge the tank and then only kick on as the pressure in the tank drops below a preset threshold. Having the air reservoir also eliminates any weird pulsation from your air supply while spraying paint. Getting an airbrush compressor with a tank is the best compromise between price and noise and surprisingly, won’t break the bank.
So What Kind of Airbrush Compressor Should I Get?
As you can see there are a lot of choices but some of them are actually easy to eliminate like canned air and spare tires. Honestly the tire as a reservoir isn’t worth the hassle and the dirty little secret about canned air is that if you’re paying twelve dollars a can for that, by the time you’ve purchased eight cans you could have purchased a budget friendly single piston airbrush compressor that includes a storage tank.
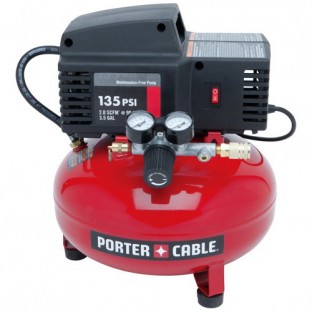
The Porter Cable Shop Air Compressor is good for a lot of tasks including being a great airbrush compressor
As far as shop compressors go, I have a fairly small one. I don’t use this for airbrushing because I work in the house. I do use it for airing up bike tires and inflatables, and other odds and ends. To be honest I don’t use it all that much. I’ve had it for awhile and it always kicks on when I need it to so I feel comfortable recommending it. The shop compressor I have is the Porter-Cable PCFP02002 3.5 gallon unit. This compressor is fairly portable at 25 or so pounds and has a carry handle for those times you need to help a neighbor out with a low tire or blow up kiddie pool. This is really adequate for most of the stuff you’re going to be doing in your garage and with the addition of a manifold, and combination regulator/moisture trap would be great for airbrushing if your work in your garage or have a dedicated work space where the loud compressor noise doesn’t matter. This compressor retails for about $140 but you can get it delivered via Amazon for $100 which is a good deal and very convenient.
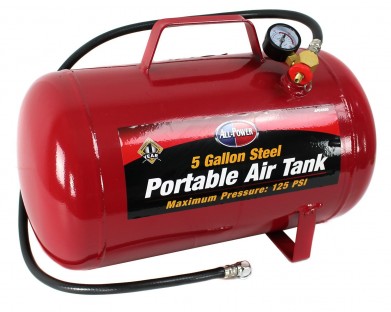
A Typical 5 Gallon Portable Air Tank – these can be found at most hardware & tool stores as well as online
If you’ve already got a shop air compressor then my recommendation depends on where you do your hobbying. Working in the garage? Get a manifold, air regulator and moisture trap. Have the shop compressor but work inside the house where that isn’t practical due to the racket the shop compressor makes? Get a portable air tank, add a regulator and fill as needed. The added benefit is that this is silent air pressure for working in the house. You can expect to pay about 40 dollars online for a 5 gallon portable air tank. You’ll need to add a regulator to the portable tank to control the air pressure to your airbrush. If you happen to have a Harbor Freight Tools nearby you can pick up a 5 gallon portable air tank from them for around $25. (You may be tempted to buy a compressor from them also but do your homework on that first. Harbor Freight is good for a lot of stuff but I’m not sure I’d trust their power tools to hold up long term.)
If you need to work indoors and be silent or almost silent then you’re going to pay a very big premium for that privilege. When I say “very big premium” I mean you’re probably going to pay five times what you would pay for a non-silent airbrush compressor. I don’t currently own one of these but I have used one and it is very quiet. I have a friend who does nail art so she bought one for her business and has found it very reliable over the course of the last couple years. While I really don’t like the idea of spending this much for an airbrush compressor I’m adding it here for the sake of completeness.
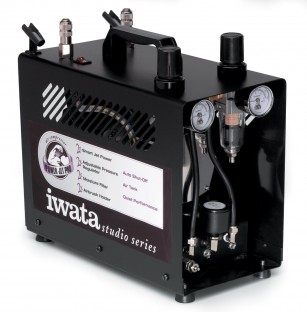
The silent and very pricey Iwata Power Jet Pro Airbrush Compressor
My recommendation for a super silent, reliable airbrush compressor is the Iwata Studio Series Power Jet Pro. This baby is almost completely silent and you pay for that with a retail price of over $550 (!). It does come with a tank and some extra bells and whistles like two separate regulators/moisture traps. It’s also actually a dual piston airbrush compressor that’s designed and built to run two airbrushes at the same time. This airbrush compressor also comes with quick disconnect fittings at the outlets – something you’ll probably want to add to your airbrush kit anyway. (I’ll be talking about these and more in the next article in this series). Extras like regulators and quick disconnects are nice features but don’t justify the total cost on their own. Again, what you’re paying the premium for here is the silent operation. For me and probably most of you, looking to get into an airbrush set up that is way too much of a premium to justify the cost unless you have a very particular set of needs (after all, that’s an extra $400 plus that you could be spending on miniatures and terrain instead of a tool). There is a “Power Jet Lite” version of this airbrush compressor without an air tank and a single regulator. That retails for$420. Both of these airbrush compressors can usually be found online with a ten to twenty percent discount.
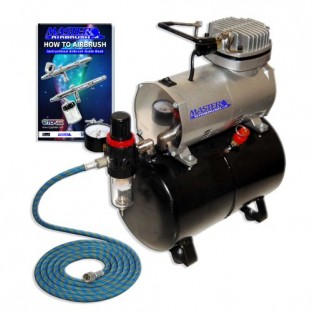
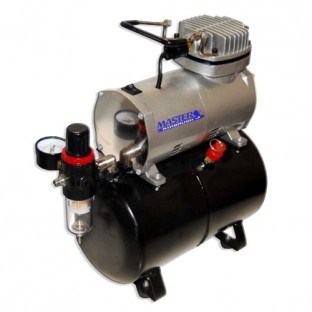
The Master Airbrush Single Piston Airbrush Compressor with Tank as sold on Amazon. All of this for only $89 plus shipping!
Finally we have what I consider to be the best of all worlds for hobbyists looking to get an airbrush compressor. Allow me to introduce you to the Master Airbrush TC20T Airbrush Compressor. This unit is a purpose built single piston airbrush compressor with a tank. It include a combination regulator/water trap and even includes a six foot long braided hose. (The hose that comes with this has fittings for an Iwata airbrush. If you’re using something different you’ll need to purchase an inexpensive adapter). The best part? You get all of this for a very budget friendly $100 delivered via Amazon. This airbrush compressor also occasionally goes on promotion with free shipping for $89 or less but at $100 it’s such a good deal it’s worth it to just pick it up rather than wait for a sale.
This airbrush compressor isn’t silent but it is fairly quiet. I’d describe it being equivalent to a tabletop room fan. I airbrush in a portable spray booth and to be honest, the fan noise from the spray booth mostly drowns out the compressor noise as I have the compressor on the floor under my desk most of the time. I’ve had this compressor for a couple of years and for the price (I actually paid about $120 with shipping when I purchased this a couple years ago). I think I have gotten a lot of value out of it. I don’t use it every day and when I’m doing a lot of painting I’m probably still not running it for more than 10-15 hours a week. I’ve heard a couple of people say stuff like “that can’t possibly be any good for under $100. My experience with this compressor has been excellent. I should also mention that it has a two year full warranty and TCP Global (the source for this compressor) has excellent customer service.
I do have one complaint about this airbrush compressor. The design of the connection where you install the included regulator/water trap is ill conceived and the regulator ends up being upside down when you tighten it. This has been the case for at least a couple of years and I’m a bit disappointed that this hasn’t been addressed by the manufacturer. However this can be remedied by using extra Teflon tape on the threads of either the regulator or the nipple that is attached to the air storage tank. It will take a bit of tinkering to get it seated in the upright position but it can be dealt with by the end user. This isn’t enough of a flaw to really downgrade this compressor but if I was scoring this on a scale of one to five I’d give it a 4.5 instead of a 5. Bottom line, I just don’t think you can beat this price and performance level for an airbrush compressor. This is the compressor I recommend to everyone who asks for information on airbrush compressors.
The Wrap Up and Onward to Airbrush Accessories
This wraps up the second part of a series of articles on airbrushing for miniatures hobbyists and modelers. My goal with this article was to provide you with enough information to make an informed decision on an airbrush compressor. For my breakdown and recommendations on airbrushes see my previous article “Airbrushing for the Miniatures Hobby – Airbrush Basics & Mini Reviews”. In the next article in this series I’ll talk about all of the odds and ends that you may not have considered when you started thinking about getting an airbrush and compressor. Some of these items will be things that you’re definitely going to need and some will be optional but handy to have as you grow into airbrushing.
As always, feel free to leave constructive feedback or your own tips and tricks below in the comments section.